Statewide Design Challenge
Home > How We Help > Classroom Opportunities > Statewide Design Challenge
Bring STEM to any school with a design challenge
Design challenges are activities or competitions that students participate in to solve real-world problems. Through the challenge, students engage in creative problem-solving, boosting skills like collaboration and grit.
For many schools, participating in the statewide design challenge was the perfect way to begin implementing high-quality STEM education best practices.
Annual statewide challenge
Each year, the Ohio STEM Learning Network hosts a design challenge where students collaborate to create a workable solution to key issues facing our world. Any school in Ohio can participate in the challenge.
Over the course of the challenge, we provide:
- Online resources for teachers and students
- Professional development events to support teachers
- Participation certificates for every student
- Regional and state level awards each spring
#STEMorbitsOhio
This year’s statewide design challenge features an exciting space program called Starlab. Students will explore what it means to live and work in space.
This year’s challenge is:
How do we improve the health and well-being of astronauts aboard Starlab orbiting the earth? Develop a plan, system, or product to positively impact the sustainability of the physical and/or mental health of those living in space for an extended period of time.
Potential focus areas for students include:
- Design the personal quarters for multiple astronauts
- Research and design the interior aesthetics of the station to promote mental health well-being
- Create an exercise routine with equipment that will promote bone density and prevent muscle atrophy
- Develop sustainable nutritious food production

Dates and deadlines
- May 12: Challenge Announced
- August 7: Challenge opens
- September 11, 4:30-5:30 PM: Virtual Kick-off Event Link to Zoom event
- September 14, 9-3 PM: In-Person Kick-off Event, PAST Foundation
- October 9, 4:30-5:30 PM: Virtual Starlab Expertlink and Experts Link to Zoom event
- November 15, 4:00-5:00 PM: Virtual Question and Answer Link to Zoom event
- December 8: Student designs for the optional sticker competition due
- December 18, 4:00-5:00 PM: Virtual Question and Answer Link to Zoom event
- January 9, 2024: Team registration for the competition closes
- January 12, 2024: Virtual Submission to the Hub showcase due
- February 1, 2024: Hub winners Announced- Invitation for State Showcase sent
- February 23, 2024: In-Person State Showcase in Columbus @ Battelle

Guidebook for participating educators
This guidebook for the #STEMorbitsOhio Design Challenge from the Ohio STEM Learning Network was created as a resource for both teachers and students.
Whether you are new to design challenges or have competed for years, you should find the information contained in these pages useful.

OSLN Design Challenge State Showcase
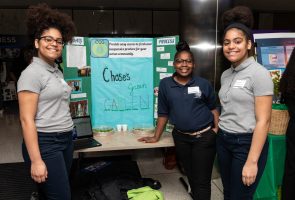
Each participating school will submit a single solution, created by a team of students.*
Solutions will typically include:
- A presentation clearly communicating the proposed idea that could include slides, a poster, or prototype
- Evidence showing the path to the solution through the engineering design cycle
* Student teams will be limited to four participants. See the guidebook for more information.
"What is the number of astronauts at a time on Starlab?" and other answers from SpaceBytes
Participating in the challenge? Your students can get answers from a multi-state network of experts in space-related industries.


Sticker Design Contest
Students are invited to create a sticker design based around the challenge.
The winning designs will be produced and distributed to all of the schools participating in this year’s design challenge.
Students do not need to participate in the statewide design challenge to enter a sticker design to the competition.
Starlab ExpertLink
The Starlab Partnership has been the catalyst for this year’s design challenge. The members of Starlab were integral in planning every aspect of this year’s design challenge and supplied all the expert knowledge contained within this booklet. We are grateful that the students of Ohio will benefit from the work of these real-world innovators.
Starlab ExpertLink is a multi-state network of experts in space-related industries who are willing to serve remotely on advisory panels to assist K-12 students in classrooms as they engage with this year’s design challenge related to Starlab and the George Washington Carver Science Park at The Ohio State University.
The ExpertLink panels will allow students to access professionals in careers that span industries engaged in low earth orbit research and development in fields that include aerospace engineering, agriculture, advanced materials, and biomedical sciences. Panels will meet via Zoom with a class. Based on project need, school request and panel availability, panels and students may meet over several months.

About Starlab
Starlab will be a free-flying commercial space station, following the International Space Station after the current station’s retirement in 2030.
Elements from Starlab will be a key part of the George Washington Carver Science Park, the first-ever science park with assets in space as well as on the ground. Scientists and engineers in Ohio will help develop Starlab through partners including Voyager Space, Nanoracks, Airbus, Zin Technologies in Cleveland, Hilton Hotels, and other companies.
Starlab and the George Washington Carver Science Park will be anchored at Ohio State University.